前言
个人将爬虫分为两类,一类是直接使用 requests 库爬取的,一类是需要使用 selenium 爬取的(比如 js 动态加载)。无论是哪一类,都需要控制请求的频率。
代码的部分基本可以要求 kimi 生成或自己查 api,所以不做赘述。此处仅介绍爬取的思路。
分析内容加载方式
一般情况下,F12 可以唤起浏览器的开发者工具。我们可以使用 F12 来对网页进行分析,决定下一步该做什么。
一般来讲,我们在浏览器上看到的网页,是浏览器加载各种 js 后显示出来的。但在我们使用 requests 库或 curl 时,由于不存在浏览器环境,并不会加载 js,所以我们需要判断要爬取的内容是否在目标页面直接响应的时候就已经存在。
一种简单的方式是直接 curl 获取页面的源码,然后检查里面是否有我们想爬的内容。这里我们介绍一下用 F12 来查看。
由于 F12 的网络工具只有在打开时才会记录请求,所以打开 F12 并点击“网络”后还要重新刷新一下页面。一般的,一个页面的直接响应会在第一位。
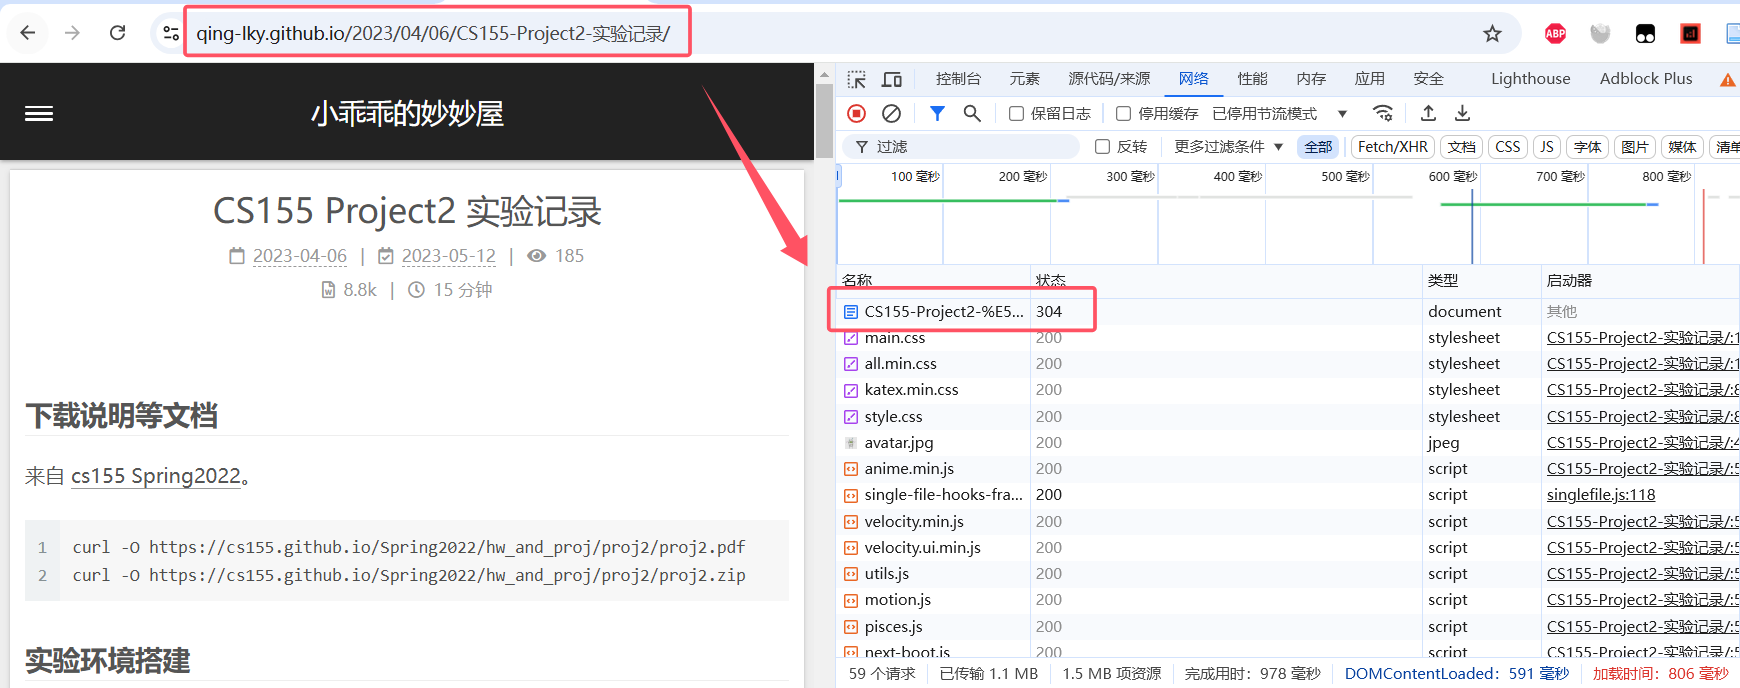
单击那个请求,点击响应,就可以看到那个响应的源码。使用 ctrl+F 搜索就可以判断想要的内容是否在上面。
如果内容不在上面,那么我们将无法直接使用 requests 库爬取页面。也就是常见的反爬手段:JS 动态加载。
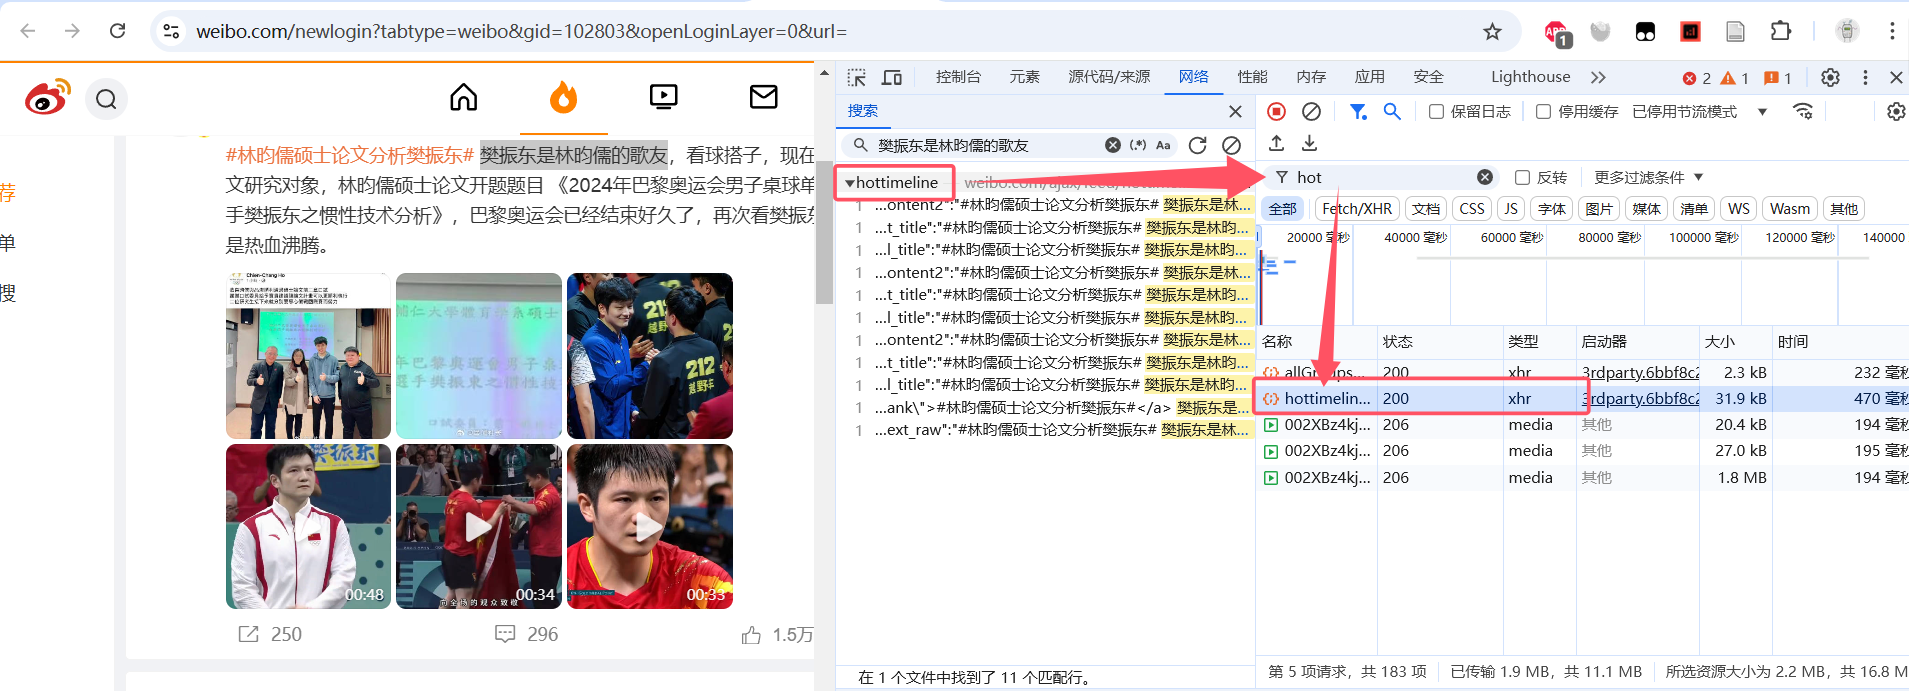
下面的微博就是一个例子。微博的内容并不在 document 类型的页面直接响应中。通过查找,我们可以发现它在一个 hottimeline 的 xhr 类型的请求里。
对于无法直接使用 requests 爬取 html 页面然后使用 beautifulsoup 分析页面代码的,有以下两种思路:
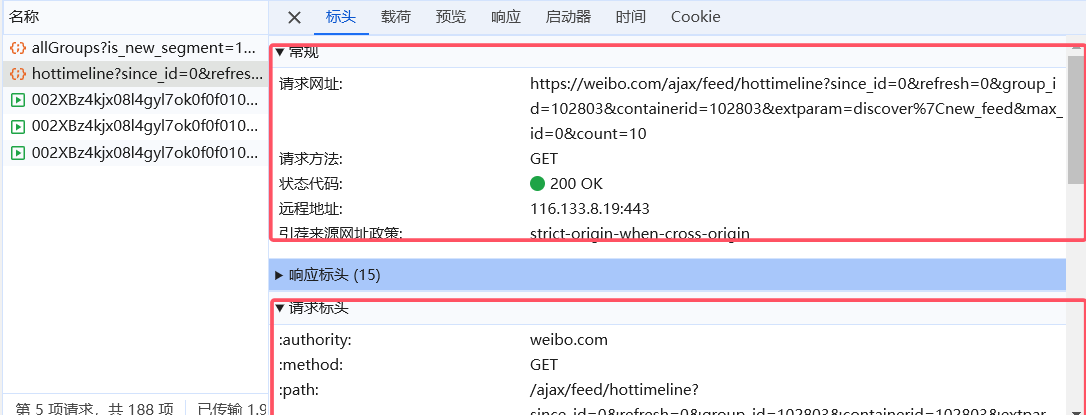
首先,直接发起对应的请求。requests 并不只能请求 html 页面,如果你能分析出内容所在的这个请求是怎么生成的(比如上面的 hottimeline 这个请求),那么你可以直接代替浏览器用 requests 库来发起它。
单击该请求,你可以尝试模仿它的 url、标头、载荷、cookie,看看能不能获取到想要的内容。
某种意义上讲,你也可以称其为对页面加载过程的逆向。可能比较复杂,特别在需要涉及到 cookie 凭证的生成等等的时候,感兴趣的可以试一下。
第二种思路就是直接使用 selenium 库。也就是浏览器自动化测试工具。这种方式原理和实现也比较简单,相当于自动打开一个浏览器,让浏览器自己加载内容然后爬取。不用操心乱七八糟的 js 动态加载、 CloudFlare 认证等,可以让浏览器甚至手动代劳。
但是 selenium 需要图形截面和 webdriver,所以难以在服务器上运行。
定位 DOM 元素
直接在页面上对应位置右键然后点击“检查”,可以跳转到元素。而在元素页面挪动鼠标,可以在页面上高亮出该元素的对应内容。
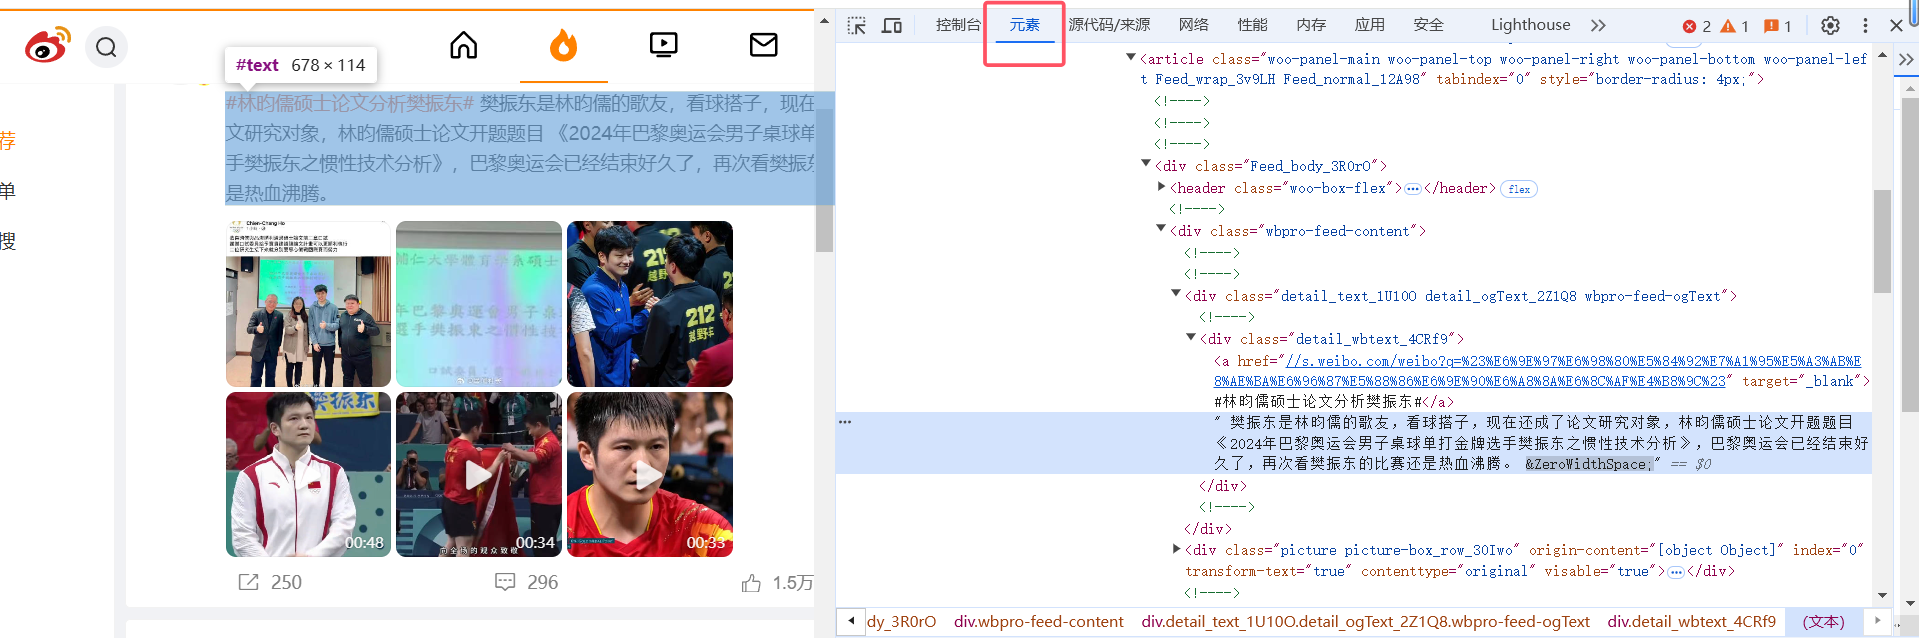
通过这种方式,你可以判断目标元素的位置,然后在右键菜单栏中复制定位的辅助信息比如 XPath 等(也可以自行观察元素 html 代码的属性),用于在代码中抓取指定元素的内容。
请注意,“元素”栏显示的是网页完成加载后的页面元素,如果使用的是 selenium,可以直接参照它来定位。但如果使用的是 requests,元素里呈现的可能与初始响应的不同(当然,大多数情况下是相同的)。
有一些特殊的情况,比如内容虽然包含在直接响应里,但是并不是在 html 页面上,而是在 html 页面源码的 js 块里(比如 IEEE)。
实际上,由于 response.text 实际上就是整个响应的 html 源码,直接对 response.text 使用正则表达式匹配出来即可。下面是一个从 IEEE 的某个文章页面的 js 代码里抓取 xplGlobal.document.metadata 的例子:
1 | response = requests.get(url, headers=headers) |
通用流程
其实针对页面的爬虫编写的步骤可以概括为:
获取包含有想要内容的页面(使用 selenium 的
driver.get或 requests 库发起请求)确定要爬的内容是哪个元素
使用页面解析库定位并获取元素(这一步如果不懂,可以把辅助信息比如 xpath、对应元素的 html 源码等发送给 kimi 要求针对性的生成代码):
a. 对于直接 requests 得到的 response,可以使用 beautifulsoup 或 lxml 等;
b. 对于 selenium,直接使用
find_elements处理数据并保存
使用 beautifulsoup 分析并定位元素
beautifulsoup 仅支持基于标签名的检索。下面是一个从 ndss 上爬取作者、摘要信息的例子:
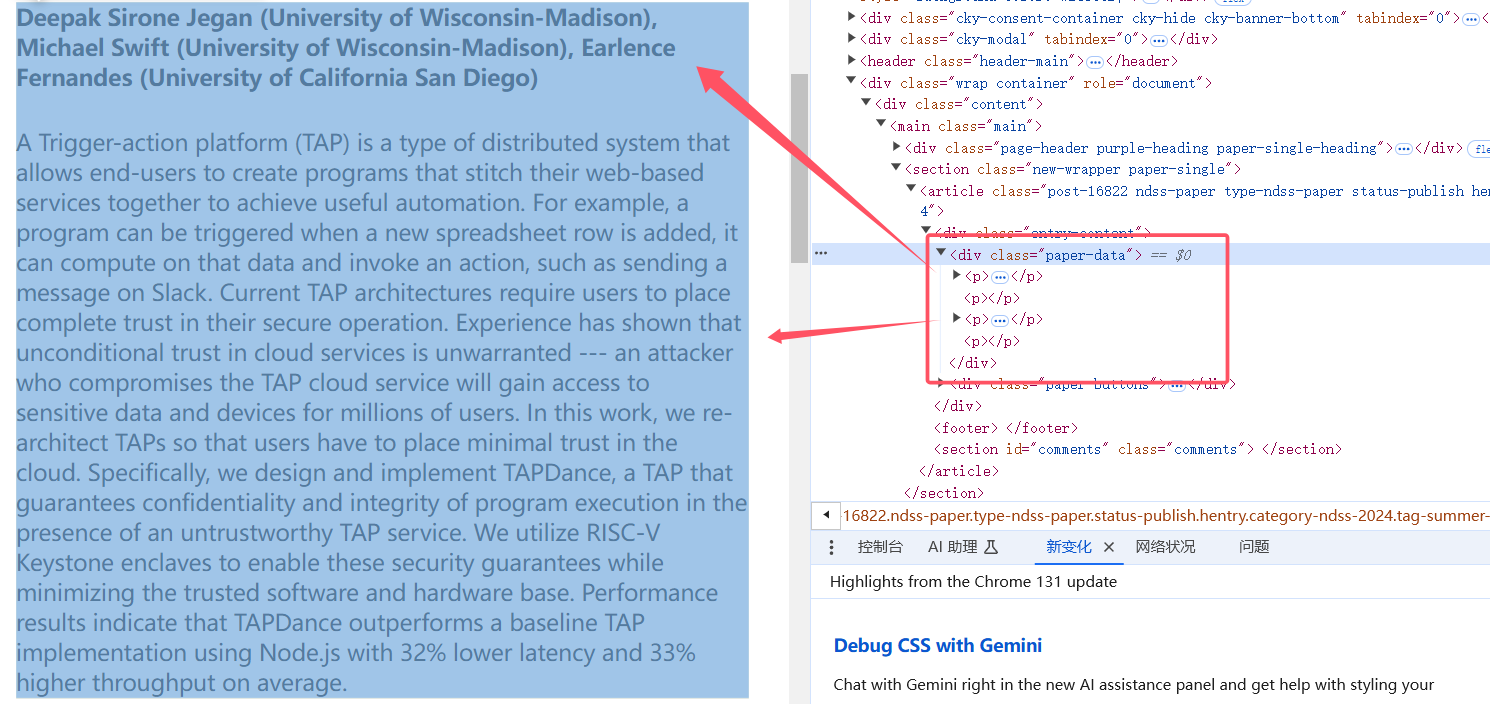
1 | response = requests.get(url) |
需要注意的是,requests 得到的是直接响应。上面的 NDSS 例子中网页结构比较简单,元素与直接响应是对应的。如果你在 F12 中看到了某个元素,但是实际爬的时候没有找到,应该去检查直接响应里这个元素是否存在,以直接响应为准处理。
换句话讲,使用 requests 爬取页面时,不要过分依赖浏览器页面上的元素布置(尤其是相对布置),因为那有可能是前端在加载页面的时候额外从 js 里弄上去的。
至于使用 requests 发起 api 请求的,得到的内容并不是 html 格式,需要使用其它的方式处理。当然,也更简单了。
使用 selenium 爬取元素
下面是使用 selenium 加载并爬取页面元素的基本例子(以推特的页面为例):

1 | driver = webdriver.Edge() |
由于 selenium 需要用浏览器来加载页面,我们需要给出足够的等待时间来让 js 上的内容加载到页面上。
你可能注意到了,我代码中使用的 XPath 非常特殊。这是因为使用 selenium 抓取页面存在一个问题:不稳定性。
以 X 的页面为例,它的 DOM 元素是前端框架动态加载的。当你调整浏览器的窗口大小、甚至换一个环境,元素对应的位置和 class 可能就会发生改变。为此,我们需要找到一个更加稳定的方式来获取这个元素。所以我结合了该 img 标签的特征写下了上面的代码。
当然,只要你把你的需求描述清楚,把你要爬的内容和元素的特征(甚至整个元素的源码复制上去)描述清楚,kimi 也是可以代劳的。
使用 selenium 的另一个好处是可以手动处理一些复杂的事情,比如登录。
1 | driver.get("https://x.com") |
我们完全可以在打开的浏览器上把有需要做的事情(比如 cloudflare 人机验证、页面登录)的事情全干了。然后再让它运行。
当然,最优雅最完美的方法肯定是去研究那些东西的机制,而不是手动来做。
防止被 ban
什么道德啊爬虫守则啊这些就不扯淡了。总之爬虫时,建议至少设置一个类似于正常浏览器的 header,并控制请求频率。
部分网站反爬只是断开链接,影响是暂时,而有些网站则会直接 ban 掉你的 ip(比如 dl.acm)。所以还是建议保持足够长的间隔,最好是到10s。没必要那么着急。
总结
其实我自己也没有多了解爬虫和 Web,这篇文章只是把我了解到的写下来,不保证准确。
selenium 基本是万能的解法。但有些时候还是要分析一下 F12 抓到的请求看看有没有更方便更优雅的做法。
并且,当你是打算抓取某个网站的“全部页面”时,你需要考虑一下你要从哪里知道所谓的“全部页面”是哪些。换句话讲:你需要先抓取导航页得到文章列表(也有些网站的文章列表藏在 JS 或某些可模仿的 API 请求里,善用 F12 和 Ctrl+F,你会找到最优雅最高效的解法),再抓取文章内容。只要有思路,实现起来都不难,毕竟有各种生成式 AI 可以辅助你。
此外,Github 上也许有已经写好的开源爬虫库可以使用,特别是 X 之类的网站。如果你要对付的是比较著名的页面,在网络上搜索也许能找到现成的代码资源。
尾声
。
